
This guide reviews changes to father engagement tracking for the 2015-2016 program year.
Tag Archives: head start
Head Start Missing Data Check on Discharge
When discharging a child enrolled in Head Start, you will receive a notification if there is missing data related to Head Start Performance Standards or data required for the Head Start PIR. The notification will display as a popup message:
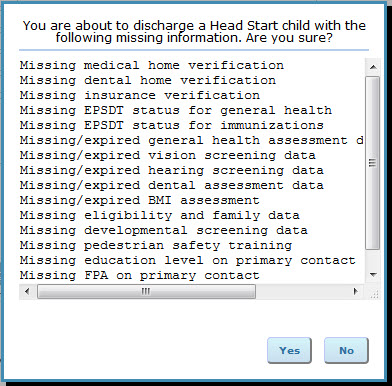
The grid below describes each data point and how the popup will display on the discharge if missing information is found. Click here for a printable version of this sheet.
| DATA CHECK | POP UP MESSAGE DISPLAY | CHILDWARE MODULE |
| Provider verification record for type ‘primary care’ with verification date during program year | Missing medical home verification | Child Record > Health Tab > Insurance & Providers Sub Tab |
| Provider verification record for type ‘dental care’ with verification date during program year | Missing dental home verification | Child Record > Health Tab > Insurance & Providers Sub Tab |
| Insurance verification record during program year | Missing insurance verification | Child Record > Health Tab > Insurance & Providers Sub Tab |
| EPSDT verification record for type ‘general’ during program year with status field completed at enrollment and at end of enrollment. | Missing EPSDT status for general health | Child Record > Health Tab > EPSDT Sub Tab |
| EPSDT verification record for type ‘immunization’ during program year with status field completed at enrollment and at end of enrollment. | Missing EPSDT status for immunizations | Child Record > Health Tab > EPSDT Sub Tab |
| General health assessment within 365 days of discharge date entered on save | Missing/expired general health assessment data | Child Record > Health Tab > Assessments & Screenings Sub Tab |
| Vision screening within 365 days of discharge date entered on save | Missing/expired vision screening data | Child Record > Health Tab > Assessments & Screenings Sub Tab |
| Hearing screening with 365 days of discharge date entered on save | Missing/expired hearing screening data | Child Record > Health Tab > Assessments & Screenings Sub Tab |
| Dental assessment within 6 months of discharge date entered on save | Missing/expired dental assessment data | Child Record > Health Tab > Assessments & Screenings Sub Tab |
| BMI assessment during program year | Missing/expired BMI assessment | Child Record > Health Tab > Assessments & Screenings Sub Tab |
| HS eligibility record in current or prior program year with the following fields completed:
Family Type Employment Status Training/School Primary Category Verified On |
Missing eligibility and family data | Child Record > HS Eligibility Tab |
| Minimum of two developmental screening event records during program year with different tools selected | Missing developmental screening data | Child Record > Events & Case Notes Tab |
| Pedestrian safety event during program year | Missing pedestrian safety training | Child Record > Events & Case Notes Tab |
| Primary contact with Education field complete | Missing education level on primary contact | Contact Record > Main Tab |
| Primary contact with Family Partnership Agreement and Family Service Specialist Signature date during program year | Missing FPA on primary contact | Contact Record > Family Partnership Tab |
| Primary contact with public assistance verification record during program year with date verified field complete at enrollment and at end of enrollment. | Missing public assistance verification on primary contact | Contact Record > Public Assistance Tab |
Family Service Tracking
This guide reviews changes to family service tracking for the 2015-2016 program year. Programs are now required to report on families who have an identified need or an expressed interest in services as well as reporting the services that were received.
To account for this change in reporting, we have streamlined tracking of family services in ChildWare.
Staff Hiring
The Hiring tab in the Staff record houses information on each employee’s experience, references, required documents (such as resume, proof of age and residency verification) and former Head Start parent designation. Many of the fields on this tab link up with reporting for DHS inspection.
 In the References area, you can capture name and date of reference verification, as well as attach letters of reference or other similar documentation.
To upload a letter of reference, click on the attachment icon. Choose the file you would like to attach, record relevant notes in the Comments field and click ‘OK’ to save.

The References area will display attached files in blue.
 Click ‘OK’ on the Hiring tab to save.
Staff Main
The Main tab in the Staff record serves two purposes: to record demographic information (such as date of birth, sex, race, ethnicity and language) and to reflect employment history (including transition, termination and rehire).
Record demographic details in the provided fields and click ‘OK’ to save.
 The Employment History grid may be updated in two ways; first, to terminate a current staff member, click ‘Select’ to the right of the employment record. Record transition/termination date, reason and notes and click ‘OK’ to save.
 The Employment History grid will update with the termination date and note. When a previously-vacant Head Start position has been filled, users will need to return to the terminated employee’s record to check the ‘Position Replaced Mid-Year’ checkbox. This information is especially important for the yearly PIR (Program Information Report) that is submited to the Office of Head Start.
To add an employment record, click the ‘Add Employment History’ button. Hiring information, such as location, hire date, title, type (including contractor, paid employee and volunteer) and status can be recorded.
If the new employment record is for a Head Start position, select the ‘Head Start Staff’ and ‘Fulfilling Vacant Position’ checkboxes where relevant. Depending on the title and status selected, additional checkboxes will appear to indicate if this position is filling a vacancy of more than 3 months or if this position has a family caseload.

Click ‘OK’ to save the new employment record. The new employment record will display in the Employment History grid for the staff member.

Health
The Health tab assembles information about each child’s physical and cognitive development. Because there are many categories of health data, this tab has been divided into the following six subtabs:
INSURANCE & PROVIDERS
Insurance & Providers is the first health subtab and is where a child’s primary care physician, dentist and insurance details can be added and updated.
Records that appear in the Providers and Insurance grids are verified records, and those details become read-only. If there is an data entry error, the original verification record should be deleted and a new verification should be added.

Verified provider and insurance information is especially important for Head Start programs and their end of year Program Information Report (PIR). As part of the PIR, programs are required to report the number of children who:
- enrolled with or without insurance
- enrolled with or without a medical home
- enrolled with or without a dental home
- received insurance coverage or a provider during the program year
- lost provider care or insurance coverage by the end of enrollment
Add a provider record via the ‘Add Provider Verification’ button. In the Provider screen, use the ‘Provider Type’ menu to indicate if you are adding a Primary Care or Dental Care provider verification. If the child does not have a Primary Care or Dental Care home, check the ‘No Primary Care Home’ or ‘No Dental Care Home’ checkbox. It is important to verify that the child does not have primary care or dental care for the PIR.

A list of existing doctors will be available to choose from or you may add a new doctor. Be sure to look through the available list of provider records (accessible via Admin on the main menu) before creating a new one to avoid duplicate data in the provider list.

Once an existing provider is chosen, address, telephone and practice details appear. Click ‘OK’ to save.
Insurance coverage information is added using the ‘Add Insurance Verification’ button. The ‘Insurance Type’ and ‘Insurance’ drop-downs contain options to indicate what type of insurance the child has (for example, dental or primary health coverage) and the specific insurance provider (such as Medicaid or private insurance). Policy number and group number fields are also included.
If a child does not have insurance coverage, the ‘Has No Insurance’ checkbox should be checked. As with provider verifications, it is important to document if a child does not have insurance for Head Start reporting.

ALLERGIES & NUTRITION
Many young children may have diagnosed allergies or food restrictions. The Allergies & Nutrition tab enables providers to document these conditions, their severity and any ongoing treatment or food substitution plans. The Allergies & Nutrition tab is organized into three areas: Infants/Toddlers, Allergies/Food Restrictions and Nutritional Events.
The first section, Infants/Toddlers, includes fields that are relevant to very young children; here you can record formula consent (along with a place to upload consent forms), formula choice, diaper size and other information.
 The Allergies/Food Restrictions grid displays allergies or special diet information. When a new allergy is diagnosed or food substitution is requested, use the ‘Add Allergy/Food Restriction’ button to record this information.
To add an allergy, select ‘Allergy’ from the ‘Type’ menu, which prompts the ‘Severity’ field to appear. A notes field provides a place to record action plans.

Record a food restriction/special diet by selecting ‘Food Restriction’ from the ‘Type’ menu. A ‘Reason’ menu appears to specify if this special diet is for religious or health reasons. Meal substitution plans or other details may be recorded in the notes field.

Click ‘OK’ to save.
The last area in the Allergies & Nutrition tab is the Nutritional Events grid, where completed nutrition questionnaires and nutrition consultations are displayed. Click the ‘Add Nutritional Event’ button to record a nutrition event.
 The date of assessment, event type (Nutrition Questionnaire or Nutrition Consultation), name of the staff member and relevant plans/recommendations can be noted. When creating a Nutrition Questionnaire, a checkbox appears to indicate if the event has resulted in an identified concern and details of the concern. After saving the assessment, corresponding documentation can be uploaded.
ASSESSMENTS & SCREENINGS
Assessments & Screenings is the next health subtab and it includes both health and mental health screenings. The Assessments and Screenings grid displays all screening/assessments for a child, screening date, screening results and notes.

Document a new assessment or screening by clicking the ‘Add Assessment/Screening’ button.
The ‘Type’ drop-down determines which assessment-specific fields appear. For example, selecting ‘BMI Assessment’ causes height, weight, BMI and weight category fields to display. Be sure to select the correct type based on the paper documentation. For example, the drop-down list includes dental assessments and dental screenings, which differ based on who conducted the exam/screening. An assessment is a formal examination completed by a doctor or dentist while a screening may be conducted by non-medical staff.

Note: a link to the CDC’s child BMI/weight category calculator is included in the BMI assessment. The CDC’s calculator requires screening date, child’s date of birth, sex, height and weight to produce the correct BMI and weight category.

Other screening types–such as hearing, vision and dental screenings–are enabled to record a concern that was identified through the screening.
Click ‘OK’ to save the assessment/screening.
SPECIAL NEEDS
In the Special Needs subtab, providers can document physical, developmental and mental health needs as well as prescribed medications and completed IEP/IFSPs.

The Special Needs grid displays all special needs for a child, any accommodations for that need and when the need was entered. Click ‘Select’ to the left of the special need to review it or record a new special need using the ‘Add Special Need’ button.

Diagnosis date, special need type, accommodations and treatment fields are included. If a child is not receiving treatment, a ‘reason’ field will appear to explain why treatment/service has not been provided. It is important to complete the full form for Head Start reporting.

Click ‘OK’ to save.
In the Special Needs subtab, the Medication grid contains medication a child is taking. Document a new medication using the ‘Add Medication’ button.
 To record a medication, add the name of the medication, if it is a prescription, dosage amount, administration time and whether or not the medication is required on an ongoing basis or during a period of time (start date/end date). Click ‘OK’ to save.
Finally, the Special Needs tab also includes an area to record IEP/IFSPs, which can be added via the ‘Add IEP/IFSP’ button.

The IEP/IFSP add screen includes start date, end date, diagnosed primary disability, caseworker and service provider fields. If the child recently transferred to your program, they may have an IEP or IFSP but may not be currently receiving services. It is important to note this for Head Start reporting.

Click ‘OK’ to save. Once saved, the IEP/IFSP will appear in the IEP/IFSP grid to review at any time.
VACCINES
Immunizations are housed within the Vaccines subtab, which includes a chart of required vaccines/expected schedule for administration, a vaccine history grid, and an area to record temporary or permanent vaccine exemption.
Document a new vaccine with the ‘Add Vaccine’ button.

Record a dose by selecting from the ‘Vaccine’ drop-down. Based on the vaccine chosen, the disease name will appear in the ‘Vaccine/Dosage Information’ section. The system will calculate the next required dose, while you will record the date the dose was given. Add any useful notes in the ‘Comment’ field and click ‘OK’ to save. To save time during the data entry process, the page will refresh and set to the next dose of that immunization type. After you have saved your last dose, click ‘Return’ to return to the child’s record.
Note: If all required doses have been administered, the vaccine will not appear in the ‘Vaccine’ drop-down.
 Once saved, the dose will appear in the Vaccine history grid.
Record a temporary or permanent immunization exemption in the ‘Vaccine Exemptions’ section of the Vaccines subtab.
EPSDT
The final health subtab tracks EPSDT (Early and Periodic Screening, Diagnostic or Treatment) status according to state guidelines. This tab contains three sections: an Assessment/Screening Summary, a Vaccines grid and an area to record EPSDT Verifications.
EPSDT verification is especially important for Head Start programs’ Program Information Report (PIR). Head Start programs are required to report the number of children who were up-to-date on EPSDT as of enrollment and the number who were up-to-date on EPSDT at the end of enrollment. The Assessment/Screening Summary and Vaccines grid will help you decide whether the child is up-to-date, as it summarizes data entered in the Assessments & Screenings tab and the Vaccines tab.
Record a verification record via the ‘Add Verification’ button.

Fields appear to document verification date, EPSDT area (general health, dental health or immunizations), EPSDT status (up-to-date, not up-to-date or on an immunization catch-up schedule), verifier’s name and notes.

Click ‘OK’ to save.
The EPSDT verification record will then display in the Verifications grid. If there is an data entry error, the original verification record should be deleted and a new verification should be added.
HS Eligibility
The Head Start Eligibility tab houses the Head Start-specific selection criteria and eligibility information that is initially entered when adding a child record. This is the family, financial and employment information that determines eligibility and priority for a Head Start enrollment slot. The HS Eligibility tab also provides a spot for recording special circumstances experienced by a child during his/her enrollment.
 You can add a new eligibility verification record or select an existing record. The eligibility record includes detailed information about the family at the time of enrollment and includes a scoring system to ensure you are serving children with the highest need for services.


The eligibility verification record includes a completion and verification date. Once the record is verified, it cannot be edited. To edit, you will need to delete and re-add the record. Note: not all users have permission to delete data from ChildWare. If you do not have permission to delete, seek out the help of someone from your agency/site to discuss if this data should removed.
 Directly below the Eligibility Verification section on the HS Eligibility tab is the Special Circumstances area, where significant family circumstances should be recorded. It is very important to record Special Circumstances as they become known because these events are included in the end-of-year Program Information Report (PIR) required by the Office of Head Start.
Click the ‘Add Special Circumstances’ button to create a new record.
 The Circumstance drop-down contains significant events or crises that a child may experience, though an ‘Other’ option allows users to record circumstances that are not included in the list.

Based on the circumstance chosen, additional fields will appear to record date and other applicable details if follow-up is necessary. As an example, after choosing the ‘Homelessness’ option from the Circumstance menu, two date fields appear to record the effective date of homelessness and the date housing was acquired.
 Just as it is important to record special circumstances for Head Start children as they occur, it is equally important to update special circumstances as situations improve or change. For example, the PIR will report not only that a child experienced homelessness during that program year but also if the homelessness need was addressed and resolved within the program year.
After adding the special circumstance details, click ‘OK’ to save.
Relationships
The Relationships tab stores a list of adult (contact) and child (sibling) relationships. Each person (adult or child) has their own record in the system, so contact records can be accessed via the Contact Data menu (under Child/Family) and siblings can be accessed from the Child Data grid.
From the Relationships tab you can:
CONTACTS GRID
You can store an unlimited number of contact relationships to the child via the Relationships tab. The first contact added is automatically assigned as the primary contact. The primary contact indicates who will be billed for services and who is the head of household for Head Start. The secondary contact designation indicates the second person listed on a family invoice and is a household member for Head Start reporting. To expand on the contact’s profile, press ‘Select’ to the left of their name. To add a new contact to the child, click the ‘Add Contact’ button.

ADDING A CONTACT RECORD
The Add Contact screen fields to record basic information—like name, relationship and a phone number—for the contact. You may choose from a list of existing contacts or add a new contact. Click ‘OK’ to save the contact.
 To add additional demographic data, address, contact and emergency contact/pick-up details to the contact record, click ‘Select’ next to the contact in the Contacts grid. The contact’s name will be displayed at the top of this screen, along with the child they are associated with.
DELETING A CONTACT RECORD
To delete a contact record, click ‘Delete’ in the Contacts grid. A pop-up message will appear to confirm that you’d like to delete. Note: If that contact is only associated with one child, the contact will be deleted from the system. If the contact has multiple relationships, ‘Delete’ will remove the relationship association only.

The Contact Record is organized into the following tabs:
MAIN TAB
The Main tab in the contact record displays demographic, contact and relationship information.
 The ‘Relationship to [Child Name]’ section at the bottom of this screen contains fields that are important to complete, such as:
- if this contact is considered an emergency contact;
- if they reside with the child;
- if the contact should be included on a mailing list;
- if they are allowed to pick-up (and, if so, under what circumstances); and
- what order they should appear within the Billing Contact menus elsewhere in ChildWare
 You may also add a photo for each contact in the Main tab. To do so, follow the same instructions as you would to add a child photo.
Note: you can navigate to other tabs within this contact’s profile without pressing ‘OK’ after editing each tab; however, press ‘OK’ when you have finished editing this contact record before moving on to the next contact.
CONTACT RECORD: CHILDREN TAB
Within the contact’s profile, the Children tab displays all child relationships for that contact within ChildWare.
 The Child Relationships grid includes information to understand at-a-glance whether or not this adult
- has pick-up permission;
- is an emergency contact;
- resides with the child; and
- receives mailings from your agency
To create another child relationship for this contact, click the ‘Add Child Relationship’ button where you can connect this adult to another child in the system and define their relationship, pick-up, emergency contact, residency and mailing details. You can also create this relationship from that child’s Relationship tab.
CONTACT RECORD: EMPLOYER/SCHOOL INFORMATION TAB
Here you can record employer and/or school status information for this contact. Multiple employers or schools may be added for each contact.
Note: Head Start programs will also need to document employment and school status on the child’s Eligibility Record.

CONTACT RECORD: FAMILY PARTNERSHIP TAB (PRIMARY CONTACTS ONLY)
Note: The Family Partnership tab is specific to Head Start and, therefore, will only appear for contacts whose children are enrolled in a Head Start program.
The Family Partnership tab stores Family Partnership Agreements and Family Strengths & Needs Assessments.
To record a Family Partnership Agreement, press the ‘Add Family Partnership Agreement’ button; to record a Family Strengths Assessment for the contact, press the ‘Add Family Strength and Needs Assessment’ button.
 Within the Family Strengths and Needs Assessment, there are opportunities to record family strengths/supports that currently exist from the guardian’s perspective as well as areas the family would like support, training or resources that relate to housing, adult education, employment, parenting, health and volunteering. To save, press ‘OK’.

The Family Partnership Agreement (FPA) provides a place to build family goals based on the information learned through the Family Strengths Assessment. After an FPA has been saved, goals can be created for the family by clicking the ‘Add Goal’ button.

From there, the goal is described and given a target achievement date. To meet the goal’s deadline, action steps and progress updates can be assigned as benchmarks.

CONTACT RECORD: EVENTS TAB
To enter an event for a contact, navigate to the Events tab and click the ‘Add Event’ button.
 Next, you be will asked to select from Event type drop-down, record an event date and any corresponding notes that may be important to save. You may also set reminders that may be necessary as a result of the event, for example a referral follow-up reminder.
 Read more about Contact Events here.
CONTACT RECORD: LOG TAB
The final tab in the contact profile is the Log, which functions as a place to review the history of updates made to the contact’s data. For more on the Log, visit the Log overview.

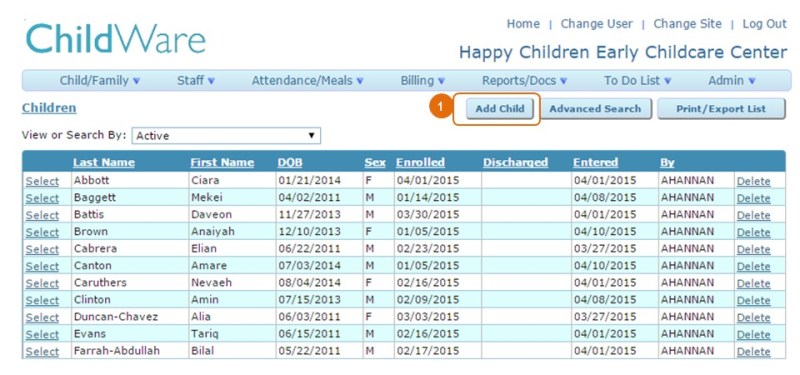
Adding a New Child
To add a new child to the system, click the ‘Add Child’ button. You will be brought to the Child Add Form. The form collects data on two tabs: one labeled “Main”, the other labeled “Head Start”.
The Main screen is where baseline information for each child is entered, such as the child’s first and last name, date of birth, gender, primary contact, referral date, expected enrollment schedule, classroom and care level.
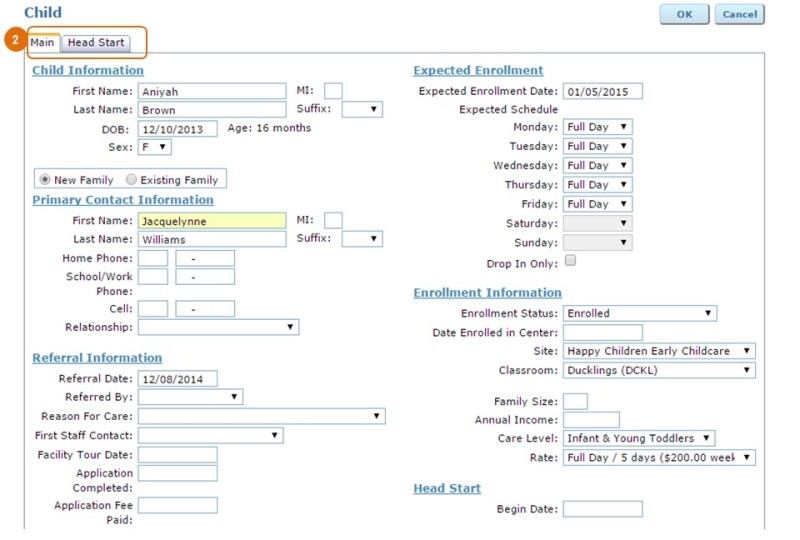
In the Primary Contact Information section of the Main screen, there is the option to connect the child to a new family or to an existing family within the system. Selecting the Existing Family option will prompt all existing contacts within the system to appear in the Billing Contact menu, where an existing contact or guardian can be chosen.

If your site offers Head Start programming, the Head Start begin date and funder should be completed on the Main tab and Head Start Eligibility information should be completed on the Head Start tab to save the child’s profile.

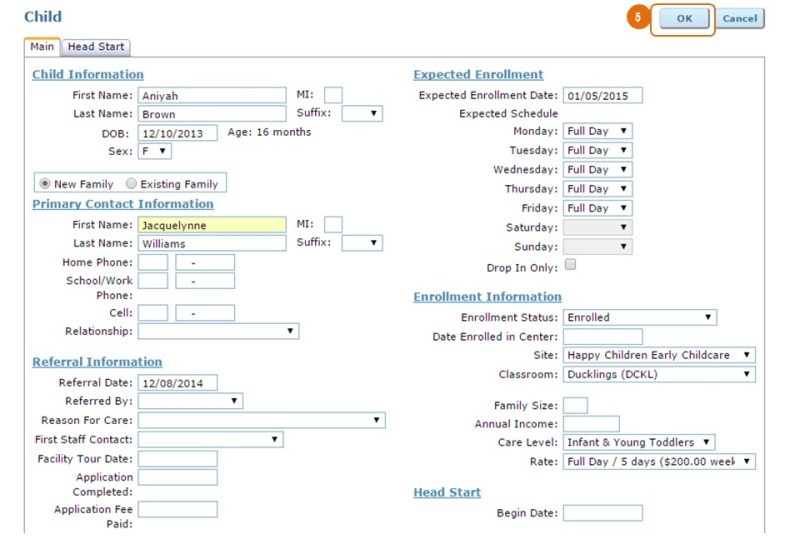
Save the child’s record by clicking ‘OK’. If any required fields are accidentally left blank, the system will identify all required fields with a red asterisk. After saving this record, the information entered in the Child Add Form will be distributed throughout a series of new tabs on the full child’s record. You can add additional information not available on the Child Add Form, or click ‘OK’ to return to Child Data.
Family Need Identified
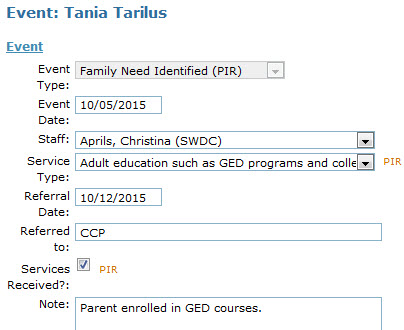
- Date: Date the parent/guardian expressed an interest or identified a need for a particular service. This defaults to today’s date so be sure to update it if you are entering an event a few days later.
- Staff: Select the staff person who will make a referral or deliver the service.
- Service Type: Select the type of service the parent/guardian is interested in or may need. Options are:
- Adult education such as GED programs and college selection
- Asset building services (such as financial education, opening savings and checking accounts, debt counseling, etc.)
- Assistance to families of incarcerated individuals
- Child abuse and neglect services
- Domestic violence assistance
- Emergency/crisis intervention such as meeting immediate needs for food, clothing or shelter
- English as a Second Language (ESL) training
- Health education
- Housing assistance such as subsidies, utilities, repairs, etc.
- Job training
- Mental health services
- Parenting education
- Relationship/marriage education
- Substance abuse treatment
- Referral Date: If the service will occur outside of your program, enter the date the referral was made.
- Referred To: Enter the individual or organization where the parent/guardian was referred.
- Services Received?: If the referral or identified need resulted in the family/individual receiving services, check this box.
- Note: Enter specific details here about the identified need, referral and service delivered.
*Only family need identified events designated on primary and secondary contacts only will be included in the count under the Family Services section of the PIR (C.50).
