The Relationships tab stores a list of adult (contact) and child (sibling) relationships. Each person (adult or child) has their own record in the system, so contact records can be accessed via the Contact Data menu (under Child/Family) and siblings can be accessed from the Child Data grid.
From the Relationships tab you can:
CONTACTS GRID
You can store an unlimited number of contact relationships to the child via the Relationships tab. The first contact added is automatically assigned as the primary contact. The primary contact indicates who will be billed for services and who is the head of household for Head Start. The secondary contact designation indicates the second person listed on a family invoice and is a household member for Head Start reporting. To expand on the contact’s profile, press ‘Select’ to the left of their name. To add a new contact to the child, click the ‘Add Contact’ button.

ADDING A CONTACT RECORD
The Add Contact screen fields to record basic information—like name, relationship and a phone number—for the contact. You may choose from a list of existing contacts or add a new contact. Click ‘OK’ to save the contact.
 To add additional demographic data, address, contact and emergency contact/pick-up details to the contact record, click ‘Select’ next to the contact in the Contacts grid. The contact’s name will be displayed at the top of this screen, along with the child they are associated with.
DELETING A CONTACT RECORD
To delete a contact record, click ‘Delete’ in the Contacts grid. A pop-up message will appear to confirm that you’d like to delete. Note: If that contact is only associated with one child, the contact will be deleted from the system. If the contact has multiple relationships, ‘Delete’ will remove the relationship association only.

The Contact Record is organized into the following tabs:
MAIN TAB
The Main tab in the contact record displays demographic, contact and relationship information.
 The ‘Relationship to [Child Name]’ section at the bottom of this screen contains fields that are important to complete, such as:
- if this contact is considered an emergency contact;
- if they reside with the child;
- if the contact should be included on a mailing list;
- if they are allowed to pick-up (and, if so, under what circumstances); and
- what order they should appear within the Billing Contact menus elsewhere in ChildWare
 You may also add a photo for each contact in the Main tab. To do so, follow the same instructions as you would to add a child photo.
Note: you can navigate to other tabs within this contact’s profile without pressing ‘OK’ after editing each tab; however, press ‘OK’ when you have finished editing this contact record before moving on to the next contact.
CONTACT RECORD: CHILDREN TAB
Within the contact’s profile, the Children tab displays all child relationships for that contact within ChildWare.
 The Child Relationships grid includes information to understand at-a-glance whether or not this adult
- has pick-up permission;
- is an emergency contact;
- resides with the child; and
- receives mailings from your agency
To create another child relationship for this contact, click the ‘Add Child Relationship’ button where you can connect this adult to another child in the system and define their relationship, pick-up, emergency contact, residency and mailing details. You can also create this relationship from that child’s Relationship tab.
CONTACT RECORD: EMPLOYER/SCHOOL INFORMATION TAB
Here you can record employer and/or school status information for this contact. Multiple employers or schools may be added for each contact.
Note: Head Start programs will also need to document employment and school status on the child’s Eligibility Record.

CONTACT RECORD: FAMILY PARTNERSHIP TAB (PRIMARY CONTACTS ONLY)
Note: The Family Partnership tab is specific to Head Start and, therefore, will only appear for contacts whose children are enrolled in a Head Start program.
The Family Partnership tab stores Family Partnership Agreements and Family Strengths & Needs Assessments.
To record a Family Partnership Agreement, press the ‘Add Family Partnership Agreement’ button; to record a Family Strengths Assessment for the contact, press the ‘Add Family Strength and Needs Assessment’ button.
 Within the Family Strengths and Needs Assessment, there are opportunities to record family strengths/supports that currently exist from the guardian’s perspective as well as areas the family would like support, training or resources that relate to housing, adult education, employment, parenting, health and volunteering. To save, press ‘OK’.

The Family Partnership Agreement (FPA) provides a place to build family goals based on the information learned through the Family Strengths Assessment. After an FPA has been saved, goals can be created for the family by clicking the ‘Add Goal’ button.

From there, the goal is described and given a target achievement date. To meet the goal’s deadline, action steps and progress updates can be assigned as benchmarks.

CONTACT RECORD: EVENTS TAB
To enter an event for a contact, navigate to the Events tab and click the ‘Add Event’ button.
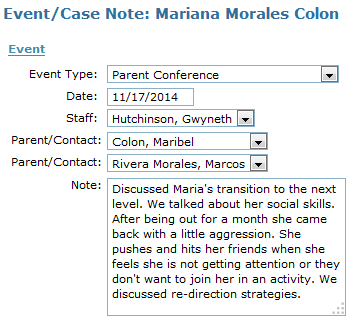
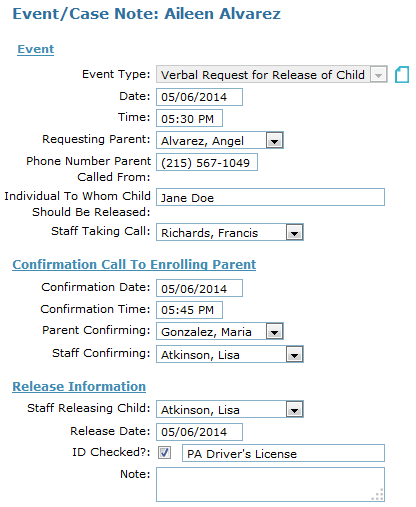
 Next, you be will asked to select from Event type drop-down, record an event date and any corresponding notes that may be important to save. You may also set reminders that may be necessary as a result of the event, for example a referral follow-up reminder.
 Read more about Contact Events here.
CONTACT RECORD: LOG TAB
The final tab in the contact profile is the Log, which functions as a place to review the history of updates made to the contact’s data. For more on the Log, visit the Log overview.


 You can add a new eligibility verification record or select an existing record. The eligibility record includes detailed information about the family at the time of enrollment and includes a scoring system to ensure you are serving children with the highest need for services.

 Directly below the Eligibility Verification section on the HS Eligibility tab is the Special Circumstances area, where significant family circumstances should be recorded. It is very important to record Special Circumstances as they become known because these events are included in the end-of-year Program Information Report (PIR) required by the Office of Head Start.
 The Circumstance drop-down contains significant events or crises that a child may experience, though an ‘Other’ option allows users to record circumstances that are not included in the list.
 Just as it is important to record special circumstances for Head Start children as they occur, it is equally important to update special circumstances as situations improve or change. For example, the PIR will report not only that a child experienced homelessness during that program year but also if the homelessness need was addressed and resolved within the program year.