All posts by childware

Customized Event Reminders

ChildWare enables you to keep a record of important events for each child such as parent conferences, observations, and early intervention. Some of these events might require follow-up at a later date and you can use ChildWare to set a reminder for you or a member of your staff.

Reminders will appear on your homepage just above the To-Do List on whatever date you specify. It will remain there until you mark it as complete. You can also request that ChildWare send an email reminder to yourself or a colleague on the specified date.ReminderHome


1. Creating a Reminder

SetReminder

1 On the “Events” Tab, fill in the event information and select the date to be reminded to follow up on this event.

2 You can include information about what exactly needs to be completed.

3 Select the staff member who should be reminded to follow up. This could be you or you can assign it to another staff member. The dropdown list will only include staff that have system user accounts in ChildWare.

4  Check this box if you want ChildWare to send an email reminder to the user specified in Step 3. The email will be sent to the address listed on the staff member’s user account.


2. Dismissing a Reminder

ReminderComplete

1 To mark a follow-up item as complete, go to Events tab on the child’s record and check ‘Action Complete’.


3. Reminder Reports

You can use event reports to get data on reminders.

ReminderReports

1 There are two event reports: ‘Events by Child’ and ‘Events by Type’.

2 Both reports have the same filters. You can filter by site, date, event type, child, or classroom.


3.a. Events by Child Report

eventsbychild

Events are grouped by child and sorted by event date, from most recent to oldest. The report shows which events have reminders and whether or not the follow-up actions from the reminders have been completed.


 3.b. Events by Type Report

eventbytype

Events are grouped by event type and sorted alphabetically by child’s last name. This report also indicates which events have reminders and whether or not the follow-up actions from the reminders have been completed.

Document Management Guide

The Document Management System allows you to store PDF files associated with child, contact, and staff records in ChildWare.

Document types include but are not limited to health assessment forms, transcripts, and clearances.

ChildWare allows you quick and easy access to files through individual staff and child records, or from the Document Center.


1. Document Fields

All documents uploaded to ChildWare must be associated with a specific field. Most fields for which a document can be uploaded will have an icon.

staffdocscreen

document This icon indicates that a document has been uploaded. Clicking this icon opens the document.

nodocument This icon indicates that no document is uploaded. Clicking this icon allows you to upload a document.


Child Health Assessments, Child Events, Staff Trainings, and Staff PD events can all have documents associated with them. However, because they are listed in grids they do not have icons.

For these types of documents, you have to click ‘Select’ in the grid order to see if a document has been uploaded to ChildWare.

staffeventgrid staffeventscreen


2. Documents Tab

Child, contact, and staff records include a Documents Tab which lists all the documents uploaded for that child or staff member.

From this tab, you can view, print, add, and delete documents. You can also print a list of documents available for that child, contact, or staff member, or you can search to find the specific document you want.

childdocscreen


3. Document Center

The Document Center provides centralized access to all child and staff files. From this screen, you can do detailed searches and find, print, or view multiple staff and child documents at once. The Document Center is accessible under “Reports/Documents” on the Main Menu.

DocCenter


4. Viewing and Printing Documents

Regardless of how you access them, all documents will open up in a new window or tab. If nothing happens when you click the icon, you might have to disable your pop-up blocker. Click here for information on how to disable the pop-up blocker

newtab

4.a. Viewing & Printing Documents by Field

The quickest and simplest way to view a document is from the actual field within the child or staff record.

staffeventscreen

document This icon indicates that a document is available for viewing. To view the document, just click the icon.


Remember that Child Health Assessments, Child Events, Staff Trainings, and Staff PD events can all have documents associated with them but that these icons will not show because these documents are listed in grids. To see if there is a document available for viewing, click ‘Select’ in the grid to see the icon then proceed as outlined above.

staffeventgrid


4.b. Viewing & Printing Documents from the Documents Tab

staffselect

1 Click ‘Select’ beside the document you want to view.

staffview

2 On the Document Screen, click ‘View Document’ to open it.

staffsearch

If the child or staff person has many documents in their record, you may find it useful to limit the document list to certain types of documents. To do this:

3 Select ‘Document Type’ from the ‘View or Search By’ drop-down; then,

4 Select the appropriate document type from the ‘Search For’ drop-down list.


4.c. Viewing & Printing Documents from the Document Center

By default, the Document Center will not list any documents. To view available documents, you will need to provide some details on the documents you are searching for.

DocCenterChild 1 First, indicate whether you want to view staff or child documents

2 When viewing child documents, you can filter by document type or classroom, or you can look up all the documents for a specific child. You can also filter by the dates that the child was active or by their enrollment date.

DocCenterStaff

3When viewing staff documents, you can filter by document type, staff title (e.g. all Assistant Teacher documents), program staff vs. administrative staff, site-based vs. agency-wide staff, or look up all documents for a specific staff member. You can also filter based on their hire date or look for documents related to trainings or events that took place within a specific date range.

4 Once you have selected search parameters for the documents you want to view, click ‘Search Documents’.

DocCenterResults

A list of all documents that meet your specified parameters will be displayed.

5 To view an individual document, click ‘Select’ beside the document you want to view.

6 You can also choose to view all the documents in a single PDF file by clicking ‘View All Documents’. This is useful in cases where you need the same document for multiple staff or children – e.g. if you want to print all staff health assessments.


5. Uploading Documents

5.a. Uploading Documents by Field

clickicon 1 To add a document, click on the icon beside the associated field. You will be taken to the document upload screen.

AddStaffDoc9

2 Click ‘Browse’ to find the document you want to upload on your computer.

AddStaffDoc1

3Select the document you want to upload,

4 Then click ‘Open’. You will be taken back to the document upload screen.

uploaded 5 Now the name of the document will be displayed beside the ‘Browse’ button. Verify that this is the document you meant to upload and click ‘OK’ to save.

6 When you return to the staff or child record, the icon will have changed, indicating that a document has been uploaded.

AddStaffDoc10


5.b. Uploading Documents from the Documents Tab

AddStaffDoc 1 On the Documents Tab click ‘Add Staff (or Child) Document’. You will be taken to the Document Upload Screen.

AddStaffDoc2 2 Specify the type of document you want to upload.

AddStaffDoc3 3 For certain Document Types, such as Training, there may be multiple records that the document could be associated with. Select the correct record from the list.

AddStaffDoc4

4 Click ‘Browse’ to find the document you want to upload on your computer.

AddStaffDoc7 5 Select the document you want to upload, then click ‘Open’. You will be taken back to the document upload screen.

AddStaffDoc8 6 Now the name of the document will be displayed beside the ‘Browse’ button. Verify that this is the document you meant to upload and click ‘OK’ to save. The document will now appear in the list on the Documents Tab.


5.c. Uploading Documents from the Document Center

AddChild1 1 On the Document Center screen, click ‘Add Document’. You will be taken to the Document Upload Screen.

*Please note that you need to indicate whether or not you are uploading a child or a staff document.

AddChild2 2 Specify the type of document you want to upload.

AddChild7

3 Next, select the child (or staff person) to whom the document should connect.

AddChild4 4Click ‘Browse’ to find the document you want to upload on your computer.

AddChild5 5 Select the document you want to upload, then click ‘Open’. You will be taken back to the document upload screen.

AddChild6 6 Now the name of the document will be displayed beside the ‘Browse’ button. Verify that this is the document you meant to upload and click ‘OK’ to save.

The document will now appear in the list on the Document Center main screen.


6. Removing or Replacing Documents

  • Documents can only be deleted from the Documents Tab or Document Center.
  • To replace a document, you must first delete the original document then upload the replacement document.
  • Please note that once documents are deleted from ChildWare’s Document Management System they cannot be retrieved.
  • You should delete documents only if you are absolutely certain you no longer need them. You may want to save documents from the Document Management System onto your computer or network before deleting them from ChildWare.Delete

1 To delete a document, click ‘Delete’ in the list on the Documents Tab or Document Center.


7. Document Types

Child Documents

  • Assessments:
    • Blood Lead Assessment
    • Dental Assessment
    • Health Assessment
    • Hearing Assessment
    • Vision Assessment
  • Child Service Agreement
  • Child Service Report
  • Emergency Contact & Consent Form
  • Formula Consent
  • Photo & Media Release
  • Events: (Documents can be associated with all event types)
    • Administrative
    • CACFP Enrollment Application
    • Early Intervention
    • Health
    • Illness
    • Injury
    • Observation
    • Parent Conference
    • Parental Involvement
    • Redetermination
    • Subsidy Application
    • Transition

Staff Documents

  • CDA Certificate
  • Child Abuse Clearance
  • Criminal Background Clearance
  • Diploma
  • Director’s Credentials
  • FBI Clearance
  • Health Assessment
  • References
  • SAC Certificate
  • State Teaching Certificate
  • Transcripts
  • PD Events: (Documents can be associated with all event types)
    • PD Plan
    • PD Activity Documentation
    • Staff Classroom Observation
    • Staff Performance Evaluation
  • Training Certificates

Enhancements to Child Health Tab

As a part of the Head Start Data Integration project, ChildWare now includes features for documenting and tracking more in-depth information on health providers, services and assessments. Providers with children in Head Start will also be able to add verification that children are current with EPSDT requirements.

The Health Tab now includes 6 sub-tabs, each of which is explained below. The information previously on the Special Needs and Vaccines Tabs is now stored in these sub-tabs.

newhealthtab


1. Insurance & Providers

mainhealthtab

In addition to storing current physician and insurance information, providers can now keep track of when they last verified this information and whether or not the parents explicitly indicated that their child lacked insurance or a primary care provider. Providers can now also track dental providers as well as dental and vision insurance.

1The Provider and Insurance grids will show only the most recently verified primary care home, dental home, and insurance records.

2 If the parent asserted that the child had no provider or insurance, this will also appear in the grid.

3To view an existing provider or insurance record, click “Select” beside the record you want to view.

4You can add records using the appropriate “Add” buttons.


1.a. Adding Provider Verification – Existing Provider

adddoc1

1 This is the date the childcare provider verified this information with the parent. This field defaults to the current date. For records entered before the field was added, this date has been converted to the date the information was entered into ChildWare.

2 You can specify whether the provider offers Primary Care or Dental Care.

3 If the parent indicates that the child has no primary care or dental home, you can make a record of this. This will show in the grid on the main Insurance & Providers Tab.

4 To simplify future data entry, medical and dental provider records will be stored in the system and can be selected from the drop down list. If the provider is not already in the list, it can be added on this screen.

5 The system automatically pulls provider contact information from their record.


1.b. Adding Provider Verification – New Provider

adddoc2

1  If the child’s provider is not already in your site’s drop-down list, you can add their information by selecting “Add New Doctor”.

2 A new set of fields will appear which will enable you to add the provider to the list.


editdoc

3 To edit the provider record later, select “Doctors” under “Admin” on the Main Menu.


 1. c. Removing Duplicate Providers

Previously existing provider information has been converted into list format. This list can be found by selecting “Doctors” under “Admin” on the Main Menu.  While every effort has been made to avoid duplication of providers, there will inevitably be multiple entries for the same provider because of slight differences in spelling or addresses. Follow the steps below to remove duplicates:

HealthTab1

1 Find duplicates by reviewing the provider list and identify which record you want to keep.


HealthTab2

2 Tag the records you want to delete by editing the name columns so you know which records to remove.

3 Next, change children associated with the doctors you want to remove by clicking on their records in the list below.


HealthTab3

4 Select the doctor whose record you want to keep from the list.


HealthTab4

5 If there are multiple children assigned to the doctor, repeat this Step 4 until there are no children listed on the doctor’s record.


HealthTab5

6 Once you are certain you have removed all the children associated with the doctor, remove them by clicking “Delete” on the list of providers.


 1. d. Adding Insurance Verification

addins

1 This is the date the childcare provider verified this information with the parent. This field defaults to the current date. For records entered before the field was added, this date has been converted to the date the information was entered into ChildWare.

2 You can specify whether the the insurance is general, dental, or vision.

3 If the parent indicates that the child has no insurance, you can make a record of this. This will show in the grid on the main Insurance & Providers Tab.

4 If “Primary Health” is selected as the insurance option, you can indicate whether or not the policy includes vision and dental insurance.


2. Allergies & Nutrition

HealthTab7

1 Infant and toddler information related to nutrition and toileting are now stored alongside other allergy and nutrition information.

2 Allergies and Food Restrictions are now separated by Type (Allergy vs. Food Restriction) and classified by severity (Mild, Moderate, Severe)

3 Providers can now track nutritional assessments for children including the date, person performing the assessment and specific recommendations.


3. Assessments & Screenings

Assessment1
ChildWare now enables you to track an expanded number of assessments and screenings.

Assessment3

1 For several areas such as vision, hearing, dental health, mental health, development, and general health you can also distinguish between assessments, which are more formal examinations conducted by licensed professionals, and screenings which are more basic health checks conducted by less specialized staff.


Assessment4

2  The results of all assessments and screenings are indicated either by indicating than an area of concern was identified or,

3 By indicating whether the result of the assessment was normal or abnormal.

Assessment5


Specific assessments and screenings have custom fields to capture key information related to the health area being addressed.

Assessment6

1 For hearing assessments you can indicate the type of hearing test conducted.


Assessment7

2 For BMI assessments you can indicate the child’s weight, height, BMI, and weight category.


Assessment8

3 For developmental assessments and screenings, you can indicate which assessment tool was used. You can also specify whether or not a follow-up assessment is required.


Assessment9

4 For blood lead assessments, you can indicate the child’s actual blood lead level.


Assessment10

5 For Hemoglobin assessmsnets, you can specify the child’s HGB and HCT levels.


4. Special Needs

specialneeds

1 Special Needs function largely as they did before.

2 Medication Administration can now be tracked separately. You can specify the time period for which the medication should be taken or if the medication is ongoing. You can also record the dose, frequency, and any special instructions.

3 ChildWare now  includes a more robust tracking system for Individual Family Service Plans and Individual Education Plans. You can now track multiple plans, their start and end dates, the diagnosed disability, and any special interventions being received.


5. Vaccines

The vaccines section functions exactly as it did before. The only difference is in its location.

vaccine

Photo Guide

ChildWare allows you to upload photos of children and contacts making it easier for center staff to identify children and family members.  These photos are stored on the individual child and contact records and appear on several reports.

You can also see a quick overview of photos of a child’s contacts on their relationships tab (below).

photos13


1. Technical Details

  • Photos can be uploaded by computer or smartphone
  • Photos are automatically resized to 200×200 pixels
  • Photos can be cropped after upload to capture the most relevant part of the photo
  • Photos must be in JPEG/JPG or PNG format
  • Photos must be 2MB or smaller
  • For the best report output, a plain white background is recommended

2. Uploading Photos from Your Computer

photo1

1 On the Main Tab of the Child (or Contact) Record, click “Choose File”.


photo2

2 Find the file you want to upload on your computer.

3 Photo files must either be JPEG/JPG or PNG files and must be under 2 MB (2,000KB) in size.

4 When you have found the file you want, click “Open”.


photo3

5 The photo you selected will appear on the bottom left corner of the screen. You can crop it to remove any unwanted portions of the background. To crop the photo, click on it and drag your mouse to select the area you want. Once you have the area you want, click “Crop & Save”.


photo46 The photo will now appear on the Child’s Record. It can be removed by clicking “Delete Photo”.


3. Uploading Photos from Your Smartphone

Note that most smartphones by default take very large photos. For best results, we recommend switching your smartphone camera to the lowest setting for photo size before taking photos for ChildWare.

photo1

1 Log into ChildWare on your smartphone, find the record of the child whose photo you want to take/ upload and click “Choose File”.


Depending on the make/model of your smartphone, some version of this screen will appear.
photo5
2 Select “Camera” if you want to take a new photo to upload.

3 Select “Gallery” (or the equivalent) if you already have the photo on your phone and just want to upload it.


After you take or select the photo you will be returned to the Child’s Record in ChildWare. The photo will be displayed on the bottom of the screen.

photo6
photo7

4 Tap the photo and drag your finger to select the area of the photo you want to use.


photo8
5 Once you have your desired area selected, zoom in on the outer area of the screen to select the “Crop & Save” button.


The photo should now appear on the Child’s Record.
photo9


4. Photo Reports

Photos are included in the following reports, all of which appear under Child/Family on the Reports Screen:

  • Child/Contact Photos (New as of July 2014!)
  • Birthdays by Room and Month
  • Emergency Contact and Health Information

Child/Contact Photo Report

photo12
1 Child’s name and classroom assignment

2 Any other children in the agency listed as siblings

3 The Primary and Secondary Billing Contacts are listed first followed by all other contacts in alphabetical order

4If a contact has any pickup status other than “Any Time”, it will appear in red.


Birthdays by Room and Month Report

photo10


Emergency Contact and Health Information Report

photo11

Attendance & Time Tracker Guide

What is the Attendance & Time Tracker?

The Attendance & Time Tracker is a time clock feature that records arrival and departure times for children and staff. By using the new Attendance Kiosk interface, parents and staff can sign in and out of the system each day. It replaces the need for paper sign-in/out sheets for children and paper timesheets for staff. The Attendance & Time Tracker automatically updates the attendance/meals rosters for children, reducing time spent on data entry. For staff, it tracks staff hours and staff/child ratios to ensure your center is in compliance.

How Does It Work?

Both parents and staff are assigned a Personal Identification Number (PIN) in the system. They will use this PIN to sign in and out of the Attendance Kiosk (the kiosk) each day. To set up the kiosk, a member of your staff must login to http://www.childware.org on a computer that is accessible to staff and parents.


 1. PIN SETUP & MAINTENANCE

  • You will be required to set up Personal Identification Numbers (PINs) for contacts (parents) and staff.
  • PINs can be added, updated and deleted at any time by ChildWare users.
  • If a parent or staff member forgets his/her PIN, you can look up and edit this information in ChildWare.

1.a. Parent/Contact PINs

select

1 Select ‘PIN Maintenance’ on the Child/Family Menu.


contactpinscreen

The system will display a list of:

2 All active contacts;

3 All children they are authorized to pick up at any time; and

4Their PINs.

From this screen, you can print a list of all contacts and their PINs.

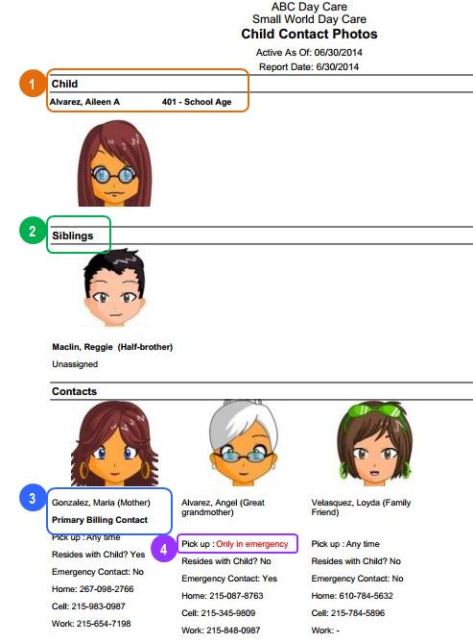
  • Note that only contacts who have a pickup status of ‘any time’ will be able to sign in/out children via the Attendance Kiosk. Those contacts that have any other pick up status will need to ask a staff member at the site to sign the child in or out on their behalf.
  • The pickup status of a contact can be changed at any time from the Child Record.

pinedit

5 Click “Select” beside the name of the contact whose PIN you want to add or edit.

6 On the following screen, enter or edit the PIN as needed. Note that the system will record the last time the PIN was altered and by whom.

  • PINs must be 4-10 characters with at least one letter and one digit.
  • Note that the PIN is assigned to the parent and not the child so each contact has their own unique PIN.

 1.b. Staff PINs

staffpin
Staff PINs function in the same way as Parent/Contact PINs. The only difference is that they are accessed from the Staff Menu item.


2. Kiosk Setup

You will need a computer or tablet at the entrance of your center, or the entrance of each classroom. This device must have reliable internet access. Go to childware.org and click “Login” as you normally would to access Childware.

login

1 Enter your user name and password as you normally would.

2 Instead of clicking ‘ChildWare’, click ‘Attendance Kiosk.’


siteselect

3 Users that have access to multiple sites will need to choose a site.  Select the appropriate site from the dropdown list and click ‘Accept Site’. Users that have access to one site will be taken directly to the kiosk.


kioskscreen

You are now logged in to the Attendance Kiosk. Unlike other parts of ChildWare the kiosk will not time out and require you to log in again. It can remain open all day while parents and staff are coming and going.

4 If you activate the kiosk before noon, it will default to ‘Sign-In’. If it is activated after noon, ‘Sign-Out’ will be the default. Users can switch between both tabs using the mouse.

5 There are three separate login options:
Parent:  For parents/guardians signing children in or out.
Staff (Child Sign In):  For staff signing children in or out (e.g. staff members who pick up children from school).
Staff Time Clock:  For staff members to track their work hours.

3. Signing In & Out

kioskgeneral

1 
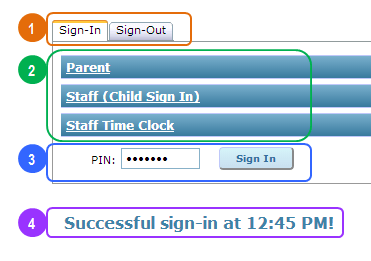
Before noon the kiosk defaults to ‘Sign-In’; after noon ‘Sign-Out’ becomes the default. Users can switch between both tabs using the mouse.

2 There are three separate login options:

Parent:  For parents/guardians signing children in or out

Staff (Child Sign In):  For staff signing children in or out (e.g. staff members who pick up children from school)

Staff Time Clock: For staff members to track their work hours.

Users can use the mouse to select the option that applies to them.

3 For all login options, the process is the same – users enter their PIN, then click “Sign In” or “Sign Out”.

4  The system will display a confirmation message with a time stamp.


kioskerrors

5 Neither children nor staff can be signed out unless they first signed in. If they forget to sign in, an authorized staff member will need to manually enter the sign-in time in ChildWare before they can sign out. If that cannot be done immediately, the parent or staff person can sign in and then immediately sign out. The sign-in time can be adjusted later by an authorized user.

6 If an incorrect PIN is entered, kiosk users will get an error message. An authorized staff person may need to look up their PIN or generate a new one for them.


 3.a.  Signing In & Out – Parents/Contacts

parentsignin1

1 After a parent or contact has entered their PIN and logged in,  the system will display a list of all children that they are authorized to pick up at ‘Any Time’. The grid includes a Status column so the parent will know if each child has been signed in yet. All the parent has to do is check off the children they are dropping off (or picking up) and click Sign In (or Sign Out).

2 Note that drop-in children (those without set schedules) must be logged in by a staff member via the Staff (Child Sign In) section of the kiosk. This ensures that staff are aware of any changes to the anticipated staff/child ratio.


parentsignin2

3 If there are notifications for that parent, the system will display a message and the notifications button.

4 When the parent clicks the Notifications button, their message is displayed at the bottom of the screen.


3.b.  Signing In & Out – Staff (Child Sign In)

staffchildselect

Staff members can use the kiosk to sign children in or out. This might be required for after-school programs, for drop-ins, or if the child is being released to an adult who does not have a PIN.

1 After entering their PIN and clicking ‘Sign In’, staff members must determine how they want to select children to be signed in or out. There are three options:

All Active: Displays all active children as of today’s date. This is useful when signing in a single child.

School: Displays a list of children who attend a specified school. This is useful when signing in afterschool children.

Classroom: Displays a list of children assigned to a specified classroom. This is useful when signing children in after a field trip.

2 Based on the first selection, a second dropdown box will appear with a list of children, schools, or classrooms for staff to choose from. The system will then display a list of all relevant children, based on the selection.


staffchildcheck

 3 The staff member can select the children they want to sign in or out from the list.

4 Once the correct children are selected, the staff person can sign them in or out. It is important that staff members click ‘Cancel’ after they are finished. This will ensure no one else signs children in or out using their PIN.


3.c. Signing In & Out – Staff Time Clock

staffsignin

1 When staff members clock in and out, the system automatically displays all their sign in and out times for the day. This enables them to keep track of their hours.

2 If staff sign in and out multiple times in a day, they must be signed out before they can sign in again. If they forgot to sign out they will either need to sign out then sign in immediately, or get an authorized staff member to enter their actual sign out time.


4. Attendance Log

The Attendance Log displays a list of all sign in/out records for a specific date or date range.

The Attendance Log cannot be viewed via the Kiosk; you need to log into ChildWare and access the Log from the Attendance/Meals section of the main menu.

attlog1

1 By default, the Attendance Log will display sign in/out times for the current date. You can choose to filter for other dates if needed.

2  The Log will display all sign-in and sign-out records for the date or date range specified. You can filter this list to see just the records you want.


attlog2

3 The child sign in/out record indicates who signed the child in.

4 Sign in/out records will be marked with an asterisk if they have been edited by a user.     


4.a. Editing or Adding to the Attendance Log

attlog3

1 From the main Attendance Log screen, you can edit any entry by clicking ‘Select’ beside the record you want to change.

2 You can also click “Add Sign In/Out to add a new entry.

In both cases, the Sign In/Out screen will appear.


attlog4

3 
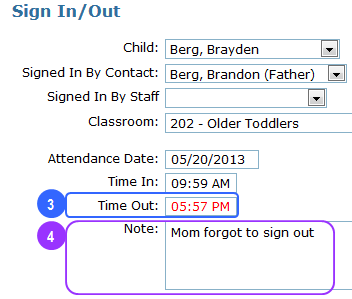
Any date or time edits will be displayed in red. If you are adding a new attendance record, all date and time fields will be in red.

4 
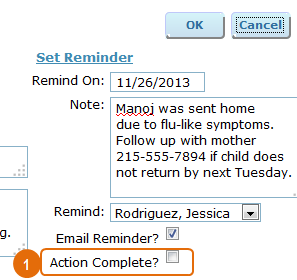
You can add a note explaining why the edit was made.


attlog5

The bottom of the Sign In/Out record displays information about the record’s creation and any edits.

5 The system records when and how the record was first created. ‘Kisok’ means it was created by someone signing in at the Attendance Kiosk. If the record was created on the Attendance Log, the name of the user creating the record would show up here.

6 The system also has a log of changes made to the sign in/out record, including the old and new values, the time of the change, and the person making the change.


5. Attendance & Meal Roster

attroster1

1 Sites using the Attendance Kiosk will no longer have to manually create weekly Attendance & Meal Rosters. These will be automatically created the first time the Kiosk is used each week. Weekly Attendance & Meal Rosters will be populated with information based on Kiosk activity.


attroster2

2 
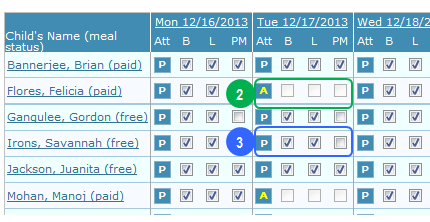
If a child is scheduled to attend (according to their active service profile) but is not signed in or out for the day, he or she will be marked as absent and no meals will be recorded.

3 If a child is signed in for the day he/she will be marked as present and those meals that were served during the child’s time in/out period will be checked off. If the child signs in or out before or after a meal is served, that meal will automatically be unchecked. (Meal times are programmed on the Site record and can be updated at any time.)

The Attendance and Meal Roster can be still edited directly. However, changes made on this screen will not be recorded in the Attendance Log. This may or may not be a problem depending on your center’s protocols.


attroster4

4 A read-only version of the daily Attendance Log is displayed at the bottom of the page for your reference.

5 To see sign in/out records for a specific day, click on that day in the grid above.


6. Attendance & Time Tracker Reports

ChildWare includes several reports  that are specific to the Attendance & Time Tracker.

attrpt1

1 All Attendance & Time Tracker reports are available under “Attendance/Meal Reports” on the main Reports/Documents page.


6.a. Pin List by Child

pinchild


6.b. Pin List by Contact

pincont


6.c. Pin List by Staff

pinstaff


6.d. Staff Attendance Summary

staffsumm


6.e. Staff Attendance Detail

staffdetail


6.f. Real Time Attendance Report

realtimerpt

This is a daily report so you will need to filter by day. The system will default to the current date. The report shows each classroom on a new page. Both children and staff are grouped by those scheduled and present and those scheduled but absent. Expected and actual times in and out are also displayed.
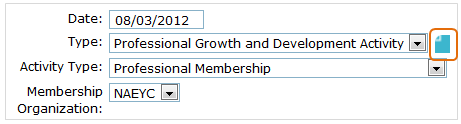
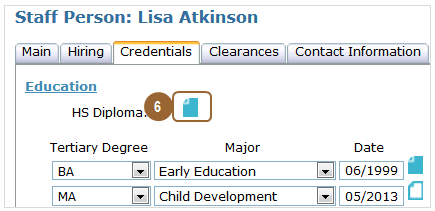
Batch Updates for Child Records

This slideshow could not be started. Try refreshing the page or viewing it in another browser.

How do I Disable the Pop-up Blocker?

Option A: Follow the Error Message

Most browsers will tell you when they’ve blocked a pop-up. In each of the cases shown below, you can click on the error messages and select ‘Allow pop-ups from this site’.

If you are using Google Chrome:

chromepopupblocker

If you are using Firefox:

firefoxpopupblocker

If you are using Internet Explorer (this will be at the bottom of the screen):

iepopupblocker

Option B: Use Your Browser Settings

If you don’t have one of these error messages to guide you, follow the instructions for each browser below. (Not sure which browser you’re using? Click here to check.)

Google Chrome

Internet Explorer

Firefox

Safari

Still Having Trouble?

Call or email us!


Why Isn’t ChildWare Working in Internet Explorer?

The most recent version of Internet Explorer, IE11, has a few quirks that may make it seem like you can’t access your data in ChildWare. The most common problem is that clicking ‘Select’ in grids does not work. Additionally, drop-down lists and other fields may appear wonky.

Never fear! Follow these simple steps to ensure you have complete access to your files.

How do I know what browser I’m using?

You can tell based on the icon. These are the icons for the four of the most commonly used browsers:

ie firefox safari chrome
Internet Explorer Mozilla Firefox Safari (Apple) Google Chrome


How do I know which version of Internet Explorer I’m using?

iesetup

Open Internet Explorer.

1 Click the tools menu

2 Click “About Internet Explorer”; a pop-up window will appear showing you what version of IE you have.


So now we’ve established that I have IE 11, what do I do?

compatibility
3 Select ‘Tools’ from the Menu Bar. If you do not see a Menu bar, right click on the top of the window and select ‘Menu bar’ to make it visible.

4 Select ‘Compatibility View settings.’ A new screen will pop up.

compatibility2
5 Add phmc.org to the list of websites to be displayed in Compatibility View.

6 Click ‘Close’ to save. Close and re-open Internet Explorer and you should be able to access ChildWare normally.

Still having trouble? Call or email us!