ChildWare allows you to upload photos of children and contacts making it easier for center staff to identify children and family members. These photos are stored on the individual child and contact records and appear on several reports.
You can also see a quick overview of photos of a child’s contacts on their relationships tab (below).

1. Technical Details
- Photos can be uploaded by computer or smartphone
- Photos are automatically resized to 200×200 pixels
- Photos can be cropped after upload to capture the most relevant part of the photo
- Photos must be in JPEG/JPG or PNG format
- Photos must be 2MB or smaller
- For the best report output, a plain white background is recommended
2. Uploading Photos from Your Computer

 On the Main Tab of the Child (or Contact) Record, click “Choose File”.

 Find the file you want to upload on your computer.
 Photo files must either be JPEG/JPG or PNG files and must be under 2 MB (2,000KB) in size.
 When you have found the file you want, click “Open”.

 The photo you selected will appear on the bottom left corner of the screen. You can crop it to remove any unwanted portions of the background. To crop the photo, click on it and drag your mouse to select the area you want. Once you have the area you want, click “Crop & Save”.

 The photo will now appear on the Child’s Record. It can be removed by clicking “Delete Photo”.
3. Uploading Photos from Your Smartphone
Note that most smartphones by default take very large photos. For best results, we recommend switching your smartphone camera to the lowest setting for photo size before taking photos for ChildWare.
Log into ChildWare on your smartphone, find the record of the child whose photo you want to take/ upload and click “Choose File”.
Depending on the make/model of your smartphone, some version of this screen will appear.
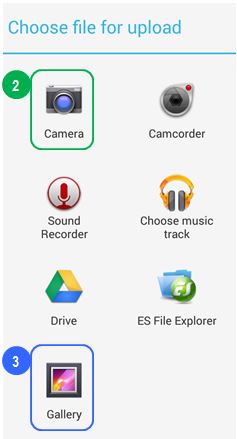
Select “Camera” if you want to take a new photo to upload.
Select “Gallery” (or the equivalent) if you already have the photo on your phone and just want to upload it.
After you take or select the photo you will be returned to the Child’s Record in ChildWare. The photo will be displayed on the bottom of the screen.

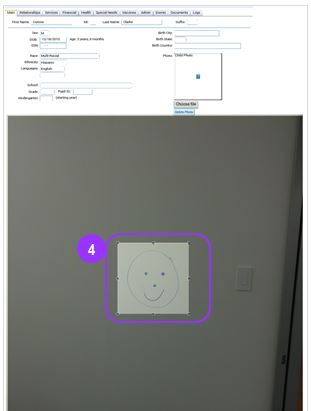
Tap the photo and drag your finger to select the area of the photo you want to use.
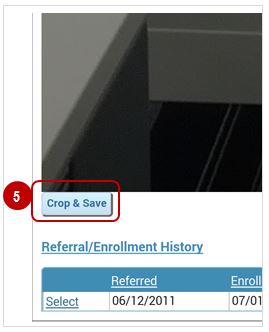
Once you have your desired area selected, zoom in on the outer area of the screen to select the “Crop & Save” button.
The photo should now appear on the Child’s Record.

4. Photo Reports
Photos are included in the following reports, all of which appear under Child/Family on the Reports Screen:
- Child/Contact Photos (New as of July 2014!)
- Birthdays by Room and Month
- Emergency Contact and Health Information
Child/Contact Photo Report
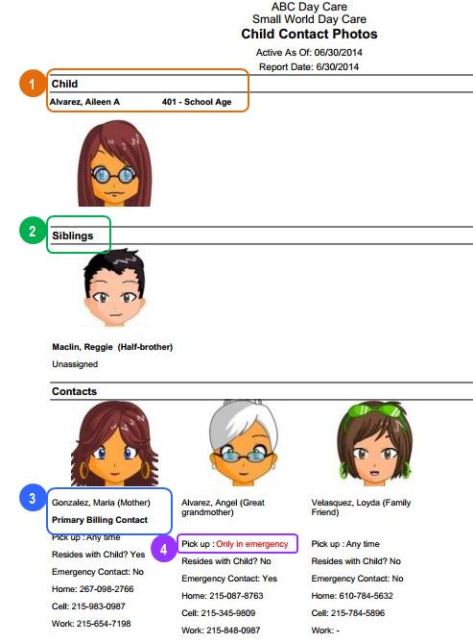
Child’s name and classroom assignment
Any other children in the agency listed as siblings
The Primary and Secondary Billing Contacts are listed first followed by all other contacts in alphabetical order
If a contact has any pickup status other than “Any Time”, it will appear in red.
Birthdays by Room and Month Report

Emergency Contact and Health Information Report


 Aside from capturing DOB, race, ethnicity and language information for a child here, the Main tab also serves as the place in the system to upload a photo for the child. To add a child photo, click the ‘Choose File’ button under the Photo box.
 Select the image file that you would like to use for this child’s photo.
 Before the photo can be uploaded to the Main tab, you will need to crop the photo into a square. Drag your cursor over the portion of the photo that you want to include in the image. Then, press ‘Crop & Save’.
 When you are ready to save all of your changes to this child’s Main tab, press ‘OK’.
