Category Archives: Child_Record

Adding a New Child

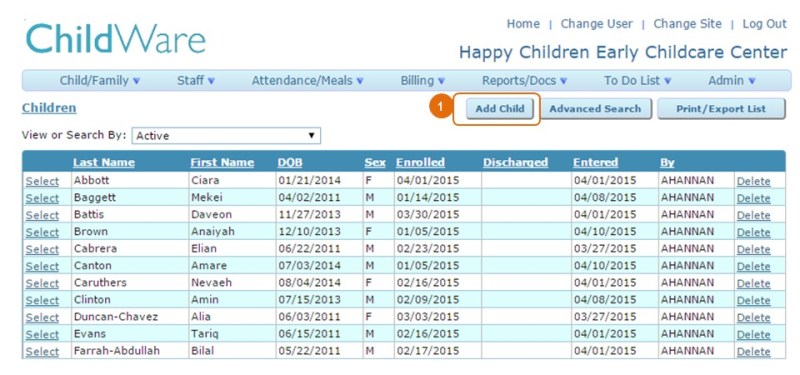
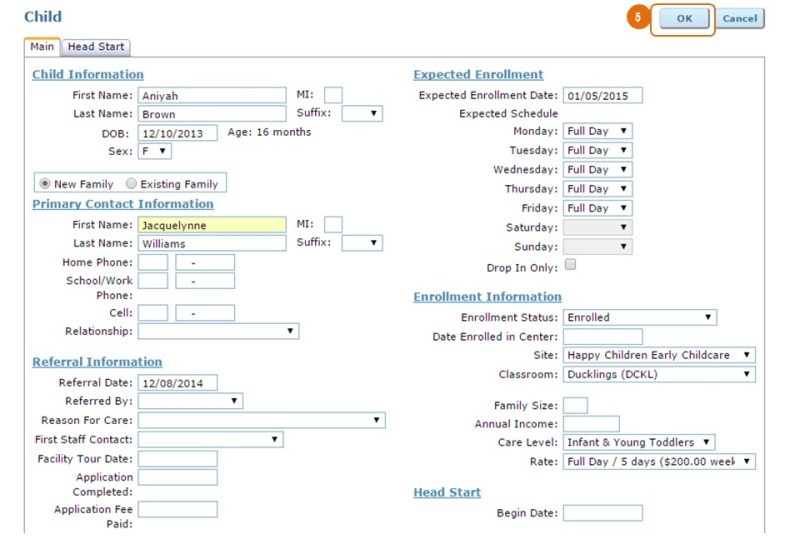
To add a new child to the system, click the ‘Add Child’ button. You will be brought to the Child Add Form. The form collects data on two tabs: one labeled “Main”, the other labeled “Head Start”.

add child

The Main screen is where baseline information for each child is entered, such as the child’s first and last name, date of birth, gender, primary contact, referral date, expected enrollment schedule, classroom and care level.

add child_main

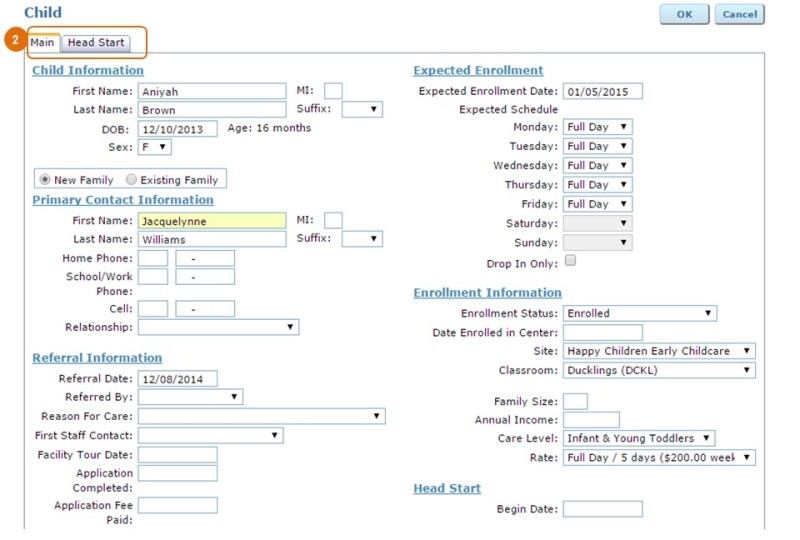
In the Primary Contact Information section of the Main screen, there is the option to connect the child to a new family or to an existing family within the system. Selecting the Existing Family option will prompt all existing contacts within the system to appear in the Billing Contact menu, where an existing contact or guardian can be chosen.

main tab_existing family

If your site offers Head Start programming, the Head Start begin date and funder should be completed on the Main tab and Head Start Eligibility information should be completed on the Head Start tab to save the child’s profile.

add child_head start

Save the child’s record by clicking ‘OK’. If any required fields are accidentally left blank, the system will identify all required fields with a red asterisk. After saving this record, the information entered in the Child Add Form will be distributed throughout a series of new tabs on the full child’s record. You can add additional information not available on the Child Add Form, or click ‘OK’ to return to Child Data.

saving new child


Child Main

The Child Main tab provides a place to record basic information about a child, including details on birth date, DOB verification, race & ethnicity and the languages spoken at home. This tab also houses the Referral/Enrollment History grid, where each enrollment record for the child is accessible.

child mainAside from capturing DOB, race, ethnicity and language information for a child here, the Main tab also serves as the place in the system to upload a photo for the child. To add a child photo, click the ‘Choose File’ button under the Photo box.

choose file to add child photoSelect the image file that you would like to use for this child’s photo.

selecting file for child photoBefore the photo can be uploaded to the Main tab, you will need to crop the photo into a square. Drag your cursor over the portion of the photo that you want to include in the image. Then, press ‘Crop & Save’.

crop and save child photoWhen you are ready to save all of your changes to this child’s Main tab, press ‘OK’.

save changes to main tab

Pedestrian Safety

pedestriansafetyevent

  • Date: Date the child and parent attended the pedestrian safety training. This defaults to today’s date so be sure to update it if you are entering an event a few days later.
  • Note: Enter specific details here.

Pedestrian Safety Training is a Head Start Requirement. When you add this event type to a child’s record, you can track the status of this requirement utilizing the Head Start Post Enrollment Deadlines or Deadline Tracking reports.

Case Notes

There are eight types of Case Notes.

  • Administrative
  • Attendance
    • Late Arrival
    • Late Pickup
  • Family
  • Fees/Payment
  • General
  • Health
  • Observation
  • Recruitment

For all but the Attendance Case Note, there are only four fields:

family

  • Type
  • Date
  • Staff Person
  • Note


For Attendance Case Notes, you can also specify if the Case Note is related to Late Arrival or Late Pickup.

attendance

Child Record

From the main menu, select ‘Child & Family’ and then  ‘Child Data’ to navigate to the list of children.

child main_child dataFrom the Child Data screen you can:

The Child Record stores important information about the child such as demographics, emergency contacts and health data. The information is organized by the following tabs:

Child Events & Case Notes

The Events and Case Notes tab provides a place to track information you want to keep as part of the child’s record. There are multiple types of both Case Notes and Events. For both Events and Case Notes you can set optional reminders to follow up on a particular issue.

event_case_note_tab
From the Events and Case Notes tab you can view, search, add, or edit Events and/or Case Notes. You can also:

  • View Case Notes or Events only
  • View only specific types of Case Notes or Events
  • View Case Notes and Events for a specific date range
  • Search the text of all Case Notes and Events to find what you’re looking for.
  • Print a list of the Events or Case Notes displayed on the screen

event_case_note_retrieve

What’s the difference between a Case Note and an Event?

Case Notes are more general and brief, whereas events are more specific and detailed. Many events automatically feed into reports and the To-Do list whereas Case Notes do not.

Mental Health Consultation – Staff

mental_staff

  • Date: Date of the consultation between the mental health professional and the teacher. This defaults to today’s date so be sure to update it if you are entering an event a few days later.
  • Mental Health Staff: Name of the mental health professional providing the consultation. The staff person must be entered into ChildWare  in order to appear on the drop-down list.
  • Parent/Contact: Select the name of the teacher involved in the consultation. The teacher must be entered into ChildWare  in order to appear on the drop-down list.
  • Note: Enter specific details here. This field is required for this event type.

Getting to Know You Meeting

get_know

  • Date: Date of the meeting. This defaults to today’s date so be sure to update it if you are entering an event a few days later.
  • Staff: Name of the staff person leading the Getting to Know You meeting. The staff person must be entered into ChildWare  in order to appear on the drop-down list.
  • Parent/Contact: Select the name of the parent or contact attending the Getting to Know You meeting. You can select up to two from a drop-down list. The parent or contact must be entered into ChildWare and linked to the child’s record in order to show up in the list.
  • Note: Enter specific details here. This field is required for this event type.

Mental Health Consultation – Parent

mental_parent

  • Date: Date of the consultation between the mental health professional and the child’s parent. This defaults to today’s date so be sure to update it if you are entering an event a few days later.
  • Mental Health Staff: Name of the mental health professional providing the consultation. The staff person must be entered into ChildWare  in order to appear on the drop-down list.
  • Parent/Contact: Select the name of the parent or contact involved in the consultation. The parent or contact must be entered into ChildWare and linked to the child’s record in order to show up in the list.
  • Note: Enter specific details here. This field is required for this event type.

Home Visit

home_visit

  • Date: Date of the home visit. This defaults to today’s date so be sure to update it if you are entering an event a few days later.
  • Staff: Name of the primary staff member conducting the home visit. The staff person must be entered into ChildWare  in order to appear on the drop-down list.
  • Parent/Contact: Select the name of the parent or contact present for the home visit. You may enter up to two from the drop down list. The parent or contact must be entered into ChildWare and linked to the child’s record in order to show up in the list.
  • Note: Enter specific details here. This field is required for this event type.